

Photo Lessons in Japan - Step1
OK, now you feel like a hunter - hunter of images. By using P (Program mode), you can shoot images without large errors - the camera set-up various things for you. The other words, camera controls the shoot - not you.
This is like cart races in Disneyland. It is fun and safe, but is not really exciting. If you would like to be a racing driver, you have to control the cart yourself. If you would like to be a photographer - you should control your camera, not let camera take the photo for you.
The Shutter
The most important things you need to understand in these camera lessons - is relationship between the shutter and the aperture. Shutter and aperture are almost same as brake and accelerator when driving an automotive.
The shutter - this is rather easier to understand. Slow shutter (speed) let more lights enter the camera. The photo becomes brighter. That sounds good - if your camera and the objects never move. But, if the camera shakes even a little bit, the picture will be blurred. So, how you can take a picture without camera shake?
The best answer is to use a tripod. The other answer is to use a fast shutter speed - finish the shoot before the camera shakes. OK - fast? It depends on the camera (with a stabilizer) and skills of photographer. Roughly speaking, 1/60 seconds is the slowest shutter speed without a tripod.
Even without camera shakes, the final image could be blurred. Why? Because the object moved while the shutter was open. Assume you take a picture of a hip hop dancer while using a slow shutter i.e. open for couples of seconds. The photo would be look like the dancer has two heads, and few arms and legs.
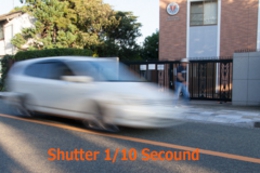
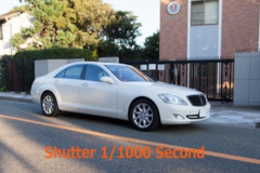
Just roughly, 1/125 seconds is recommended for the model shoot. 1/250 seconds for subject who are walking, 1/500 seconds for jogging and dancing. 1/1000 seconds should be used for sports, flying birds, running cars/ dogs.
The Aperture
Now you understand why you need to use a fast shutter speed in some shooting situations, i.e. 1/500 seconds in your kids dancing at a school event. However, a fast shutter does not allow much light to enter the camera. That means the photo might be dark. Any solution? One of the answer would be to open up the aperture. Basically, the aperture controls the size of a hole allows light to enter the camera. Sounds easy?
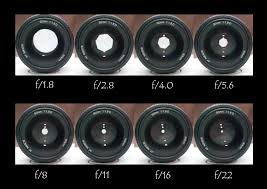
OK, fine - confusing, but understandable. So what size of the aperture does your DSLR camera offer? The aperture's F number are described on your lens, not on camera. The aperture is built into your lens, not camera.
If the aperture can be opened widely, you will have much flexibility in your shooting. That is true - but the lens that allows the aperture to be open widely (means low F number, i.e. F1.8) are generally expensive. This is because, large aperture requires physically large lens - that are heavy, and all adjustments are very sensitive in the lens.
Some other things you should know - Part I
The shutter and the aperture are most important things you should understand. However you may hear about some other functions on your camera. Let me touch on them briefly.
1) Focus Points
We will learn and practice more about composite and focus points later in step5. However, please find how to move focus points in your camera.
2) ISO
ISO can amplify the sensitivity of your image sensor to light. By adjusting it, you can make dark image brighter by applying high ISO number which will boost digital signal up. However, noises will also be increased. In these Photo lessons, please apply ISO400. DO NOT leave ISO on AUTO, that will mislead you in these photo lessons.
3) White Balance (WB)
In normal daylight, you can see the color of object most naturally. However, under a tungsten light, the object looks much yellower - the color is effected by the tungsten light. Your DSLR camera should have white balance sensor, so please set white balance (WB) to AUTO in these photo lessons.
4) Image recording quality
Please record images by JPEG LARGE format in these photo lessons. If you record the images in LAW formant, you will have much flexibility in digital post-development process. However, you must have a digital post-development software on your PC.
Practice session A)
Shutter Speed Fixed, Change Aperture and Shoot
So how would you set shutter and aperture properly? Remember in P (Program) mode, your camera set-up the shutter and aperture for you. Now you can set by yourself.
As you already know, 1/60 can be the slowest shutter speed for landscape shooting without using tripod. 1/125 should be the slowest shutter speed for model shooting. OK, let's shoot various objects using shutter speed of 1/125. Try shooting with the aperture open (apply low F number) then with the aperture closed (apply high F number) and see how two photos differs.

2) Set shutter speed 1/125.
3) Change F number (Aperture) from smallest to largest, and see how the resulting images differ. For example, start F number from 4, 5.6, 8, 11, 16, and up to 22.
You would see the image is too bright or partially white-out with low F number i.e. F4. This is because aperture is open too widely - too much light entered the camera while the shutter was opened 1/125 seconds. The image is dark or partially black-out when using high F number i.e. F16, F22. In this case, not enough light entered through the small hole of the aperture.
Practice session B)
Use S (Speed) or T (Time) mode
By using S(Speed) or T(Time) mode, your camera sets-up aperture for you. So let's try.

2) Set Shutter speed 1/125.
3) Shoot the same object of practice a), and check the F number that camera decided.
4) Compare the F number of your best choice in practice A).
5) Set shutter speed 1/500 and 1/1000, and check the F number that camera decided.
6) If possible, do the same exercise inside of some building. See what happen in case of shutter speed 1/1000?
For the image of a girl wearing summer dress above, I picked up much brighter image than the camera set up - because she wares a hat, her face looks too dark. In case of the image of Kimono girl, I picked up much darker image than the camera had set. I thought the darker image gave more of a flavor of the old Japanese house.
The brightness of a photo is very important for photography. Now you are getting used to changing the brightness of the photo by opening or closing the aperture. Well done - let's take a break.
Photography Lessons Fee in Tokyo or Yokohama
Per person's charge JPY 10,000
- 1.5 Hours for private lessons
- 3 hours for group lessons (minimum 2 persons). Further discounts applied on 3 or more students group lessons.
- Available on Tokyo or Yokohama. Lessons in the other city (i.e. Kyoto) requires additional fee.
Kawaii Model Fee for the Photo Lessons
per person's charge JPY10,000
- 1.5 Hours for private lessons
- 3 hours for group lessons (minimum 2 persons). Further discounts applied on 3 or more students group lessons.
- A kawaii model will be arranged by Santos, subject to the availability of the model.
